By Larry Seemann
Spokane, Wa.
The Basics: The Ford Model "A" car has a transverse leaf spring suspension. The springs are "sprung" with shackles between the spring perches over the top of the front and rear axles crosswise to the chassis. The chassis then sits on top of the springs with the springs nested into the channel of the front and rear frame crossmembers. Using only one spring each, front and rear, to carry the entire weight of the car and drivetrain the springs had to be strong and durable. The shackles, shackle bushings, spring perches, crossmembers, and the springs themselves all take a lot of abuse.
Application: To restore or maintain your Model "A" suspension will almost certainly eventually necessitate the removal of the springs. Such mechanical procedures as: replacing a broken spring leaf, replacing a broken spring center bolt, replacing shackles and /or shackle bushings, replacing or restoring spring perches, any work inside the differential, or just restoring the spring packs themselves will require the removal of the springs. The front spring has a relatively low arch and doesn’t spread much and therefor is not as difficult or dangerous as the rear spring to remove. I’ve included a simple and inexpensive, but effective, front spring spreader here, but our primary focus will be on the rear spring spreader.
Let me state that, in my opinion, the most DANGEROUS mechanical procedure you will ever do on a Model "A" is removing and reinstalling the rear spring. Care, caution, and the proper tools are strongly advised! The springs, especially the rear spring, are very strong and are under a lot of tension when installed in the shackles. If your spring spreader is too light for the job and collapses, or slips, or a shackle is disconnected before the tension on the spring is relieved, or any number of other things that can go wrong, serious injury could result. Be Careful!
To remove either spring the tension on the spring must be relieved from the shackles. This means that the spring must be spread or stretched. Obviously, if the spring weren’t under tension it wouldn’t be able to do it’s job. Spreading the spring means adding more "load" to the spring. Kind of like the effect of putting a large amount of weight in the car. When you do that the spring spreads and the car squats, which is the whole point of the springs—to support the car and it’s load. You can imagine how much pressure that entails. I’ve heard people talk about piling a lot of weight in the car or on the chassis to squat the spring, then tying it down to the axle with chains so that the shackles can be removed. To me anything other than the use of a proper spring spreader is just plain dangerous and not worth the risk.
If you belong to a local club chances are you can borrow a spring spreader from a fellow club member. You can also buy a spring spreader from the various parts vendors. Some of the commercially available spreaders have gotten poor reviews. Some are just not made sturdy enough and will collapse under the pressure of the spring. Bad News! Do not use an inadequate spreader. The results could be catastrophic, beside the color of blood clashes with most Model "A" colors.
If you can’t borrow a spreader, or if you just want to have one of your own and are not inclined to buy one, for whatever reason, this then is how you build you own proper and adequate spring spreaders:
Materials Required: Substitutions with lighter materials are not recommended!
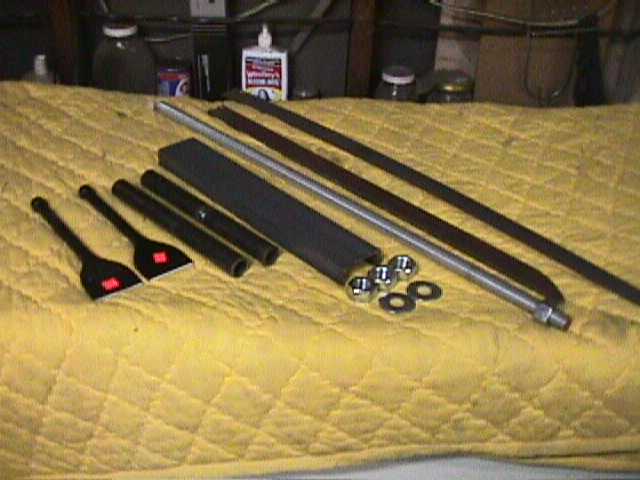
Rear spring spreader: (1) piece of 3" channel iron 18" long. (1) piece of flat bar stock 3/8" to ½" x 1 ½" to 2" x 10 " long. (1) stick of 1" all-thread. (this is the most expensive part, about $22.00 @ Napa Auto Parts) (4) 1" nuts. (2) 1" flat washers. (1) piece of strap steel ¼" x 2" about 6" long (optional). (2) 3" masonry chisels (about $4 each @ Harbor Freight Tools). (2) 11" pieces of 1" black pipe.
Front spring spreader: (1) stick of ¾" all-thread. (3) ¾" nuts. (2) ¾" flat washers. (2) pieces of ¾" black pipe 4" long. (2) pieces of ¾" black pipe 9 ¾" long. (2) pieces of strap steel ¼" x 1 ½" x 2 ½".
Acetylene torch, welder, pipe cutter, hack saw or sawsall, die grinder with cutoff wheel, 4" angle grinder, electric drill or drill press with 1" bit, bench vise.
Construction Procedure:
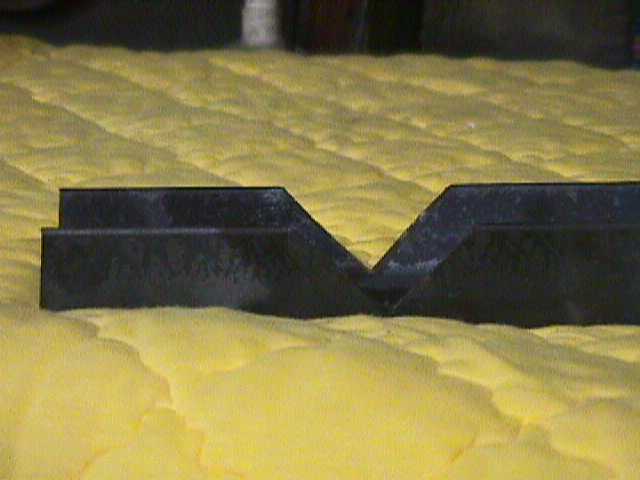
Rear spreader: Step #1:Mark your 3" channel iron 4" in from each
end. Cut four 90 degree notches out of the side legs of the channel iron
where the point of the notch intersects the marks you made 4" in from the
ends. The notches can be cut with the hack saw, sawsall or torch. Keep
the little triangle shaped pieces for future use as gussets if you haven’t
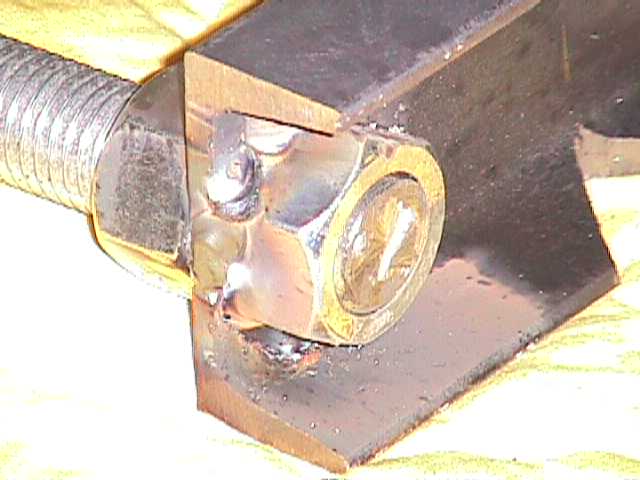
burned them up with the torch. Step #2: Drill a 1’ hole in the end of each
channel (or if you don’t have a 1" drill bit you can burn the holes out
with a torch) where the 1" nuts will be welded inside the channel at the
very ends of the channel iron. Step #3: Stick the all-thread through the
hole and screw the nut onto the all-thread on the inside of the
channel iron. Step #4: Weld the nut to the inside of the channel iron,
making sure the all-thread will screw into and out of the nut without binding.
Be
sure you have a good solid weld of the nut to the channel iron. There is
a lot of pressure on this weld, so if you are not confident in your welding
ability get a good welder to make the weld for you. Repeat Steps #3
& #4 on the other end of the channel iron.
 |
 |
You’re now at the point of bending the "legs" of the channel iron down
to form the arch that will go over the differential housing (banjo) when
the spring spreader is in use. Step #5. Clamp the channel iron in your
vice with the notches just above the vise jaws. Screw the full length stick
of all-thread into the nut from the inside of the channel iron, the side
where the nut is welded. This will give you 3’ of all-thread as a lever.
Heat the channel iron with your acetylene torch along a thin line at the
point of the notches and as the steel heats pull down on the all-thread
until the notches close up and the legs are at a right angle to each other.
Some twisting may be in order to insure that the legs are square with each
other. The angle should be exactly 90 degrees, even if the notches are
not completely closed- the welder will fill them in. If, at this point,
you find that the legs won’t close up far enough you may need to remove
a little more material from the notches with the die grinder, a file, or
hack saw. Repeat Step #5 on the other end of the channel iron.
 |
 |
You should now have an arch 10" long by 4" high that should stand level on a flat surface. If it wobbles, or any part is not square with the rest, clamp it back in the vise and apply heat and leverage with the all-thread to square it up. If it’s a little off it will probably be O.K., but you want it as square as possible.
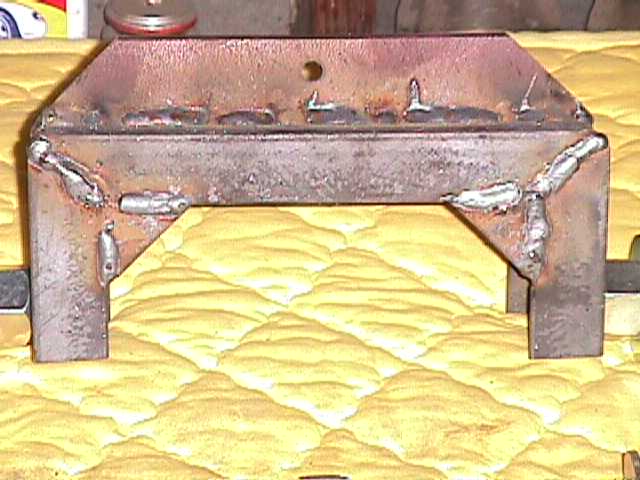
When you are satisfied that your arch is as square as you can get it
you’re ready to add the gussets and weld up the seams. At this point you
have to examine the pieces that came out of the notches to see if they
are suitable border="2" for the gussets. They may have gotten destroyed if you cut
the notches with a torch. If you need new gussets cut some out of the strap
steel mentioned in the materials needed section as optional. Step #6: Weld
the gussets in place along with welding the seams where the notches were
removed. Step #7: Reinforce the back of the arch with the piece of 3/8"
x 1 ½" x 10" bar stock. Cut a 45 degree slope on each end so you
will be less likely to snag yourself on the sharp corners, then drill a
3/8" hole in the middle of the bar, then weld the bar down the middle of
the top of the arch. You may not need this extra reinforcement, but I would
rather have the extra strength. You don’t want your spreader to collapse
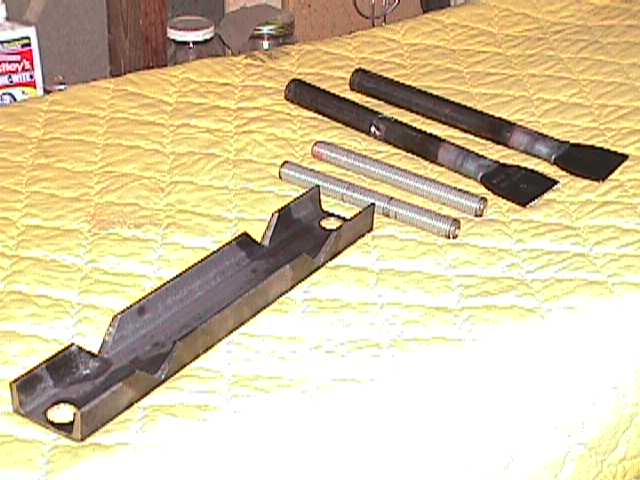
under load. Step #8: Using the die grinder cut-off tool or torch cut the
shanks off the masonry chisels about ½" up from where the shank
starts to flare into the blade. Step #9: stand one of the 11" pieces of
black pipe up in the center of the vise so that the lower end of the pipe
is supported by the bridge of the vise and clamp it in the vise. Heat the
upper end of the pipe to a cherry red and stick the shank end of the shortened
chisel into the hot end of the pipe. Tap on the sharp end of the chisel
with a pretty hefty hammer while maintaining the heat to the pipe. You
want to drive the shank of the chisel down into the pipe so that the pipe
flares out and wraps around the chisel forming to the shape of the chisel
until the pipe protrudes to the beginning of the flat of the chisel. Repeat
step #9 with the other pipe and chisel. Step #10: Weld the pipe to the
chisel just at the flared end of the pipe. Step #11: Using your angle grinder
sharpen the chisels from one side only and only out to within about ½"
from the edge. You’re making a sharp edge that will bite into the space
between the spring leaf and the spring eye, but leaving a small lip at
the side that will keep the chisel from slipping out of the eye sideways
under pressure. You’ll have to test fit this a little to make sure the
ground out area is wide enough to accept the spring. Once it’s in use the
chisels will wedge in tight and the side lips will hold the chisel bits
in place. Step #12: Clean out any burrs inside the open end of the pipe
left from cutting. The pipe will need to slide on the all-thread as the
spreader does it’s work and we don’t want anything scraping on the all-thread
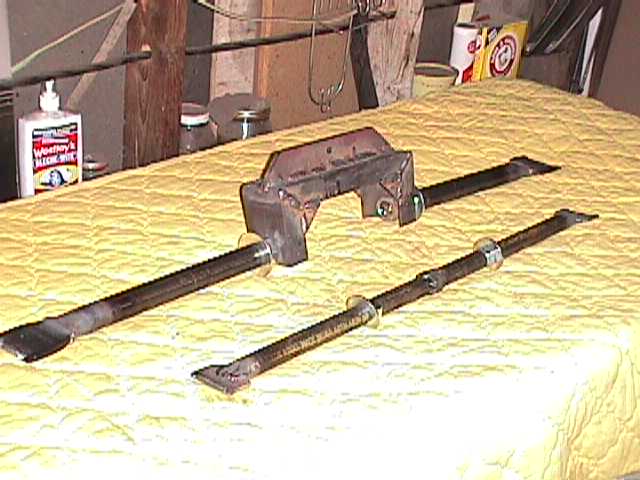
threads. Step #13: Cut two 9" pieces from your all-thread. Step #14: Thread
nuts onto the all-thread about 2 inches, then screw the all-thread into
the nuts in the arch, slip the washers onto the all-thread. Put a liberal
amount of axle grease on the threads and washers, then slip the pipe/chisels
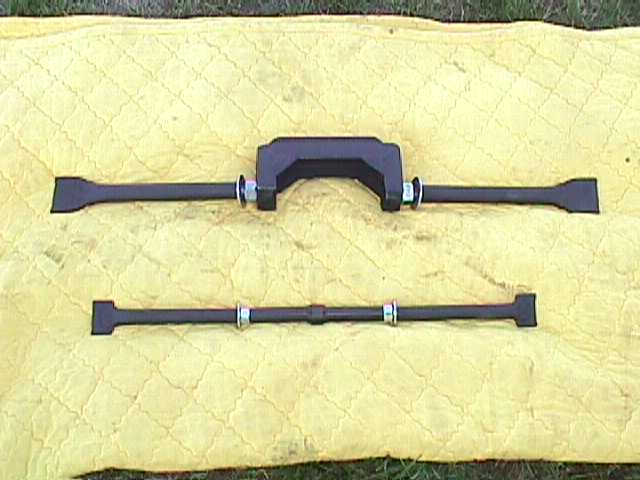
onto the threads. All Done! Of course paint is optional. A nice
bright red, to denote caution, might be nice. The all-thread can be unscrewed
from the arch for compact storage or for ease of carrying in a vehicle.
 |
 |
Front Spreader: Step #1: Cut the ¾" all-thread to 26"
long. Step #2: Thread one of the ¾" nuts onto the all-thread to
the middle. Step #3: Slide the (2) 4" pieces of black pipe onto the all-thread
from opposite ends up to the nut in the middle. Step #4: Weld the 4" pipes
to the center nut. You only need to "tack" the pipes to the nut at the
6 "points" between the flats on the nut, preserving the nut so you can
still put a wrench on it. The purpose of this center section is two-fold:
to reinforce the center section so it won’t flex and to hold the all-thread
from turning while you turn the spreader nuts. Step #5: Using the die grinder
cutoff tool or hack saw cut a ¼" notch about 5/8" deep in one end
of each of the (2) 9 ¾" pipe pieces. Step #6: Place the ¼"
strap steel pieces crosswise centered in the notches. Heat the end of the
pipe and flatten the pipe on an anvil so that the end of the pipe with
the strap forms a chisel. Weld the flattened end of the pipe to the strap.
Step #7: Clean any burrs out of the open end of the pipe so there is less
resistance when the pipe slides on the all-thread. Step #8: Using the angle
grinder sharpen the strap/ pipe "chisels" on one side only and only out
to about ¼" from the edge, in the same fashion as you did for the
rear spreader chisels. Step #9: Screw the nuts onto the all-thread and
slip on the washers, adding grease to the threads and washers. Slide on
the chisel pipes. All Done! Paint if you choose.
 |
 |
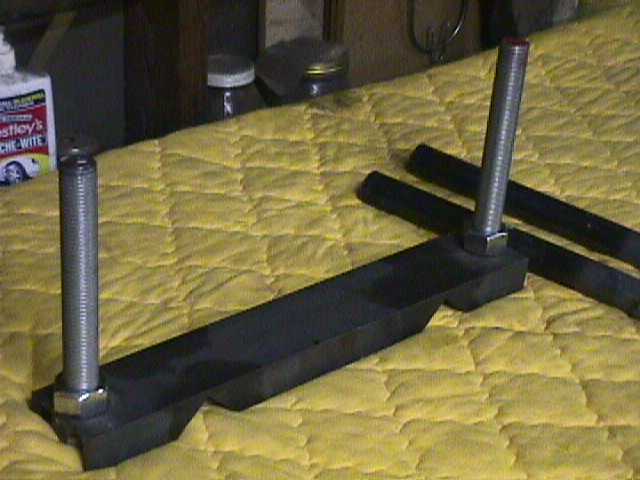
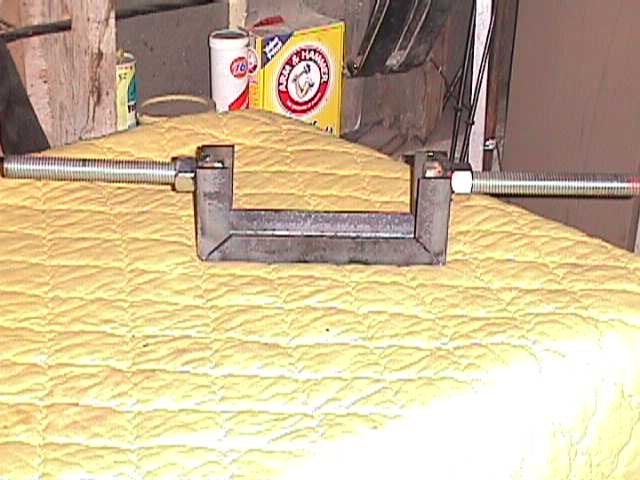
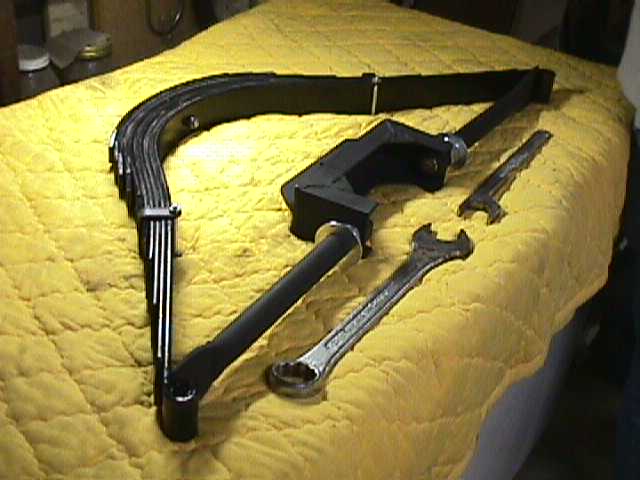
Using the Rear Spring Spreader:
Position the arch over the banjo housing. Push the chisels outboard
until the sharp edge is positioned between the leaf and spring eye, then
run the nuts out by hand as far as you can and check to make sure that
the chisels are still in position at the eye. Now you will need a 1 ½"
open end wrench or 2 or a large crescent wrench. As you turn the nuts the
spring will be pushed out or "spread". As it spreads turning the nuts gets
harder. At this point you may find it helpful to put a large punch in the
hole on the rib to help keep the arch centered over the banjo. You want
to alternate turning of the nuts so that the chisels move out more or less
equally until the tension is off the shackles. The total spread between
a completely relaxed rear spring and one that is spread far enough to attach
the shackles is almost 8".
Using the Front Spring Spreader:
Lay the spreader on top of the front axle and slide the chisels out
to contact the springs at the eyes. Run the nuts out by hand equal distance.
Tighten the nuts with a 1 1/8" open end wrench. When the nuts are snug
recheck the position of the chisels to assure they are locked into the
eye. 2 wrenches are helpful to tighten the nuts and hold the center nut
so the all-thread doesn’t turn. The "spread" on the front spring isn’t
nearly as far as the rear spring and the tension not as great, but caution
is still the by-word. This one can hurt you too, if you get careless.
Helpful Hints:
#1. When preparing to remove a spring always put your spreader in place and take the tension off the spring before removing the u-bolts at the crossmember. If the spring center bolt is broken, and the spring is under tension, the u-bolt nuts can shear off the last couple threads and the whole spring pack explode in your face. The springs may stay contained by the crossmember and u-bolts but it will, at the very least, give you quite a start. The sudden release of tension in this manner can raise the whole car off the ground.
#2. Never remove the shackle plates until all the spring tension is
relieved from the shackles. If the shackle plate is removed under tension
the shackle can break and fly apart. Sometimes it doesn’t hurt to state
the obvious.
Page designed by Jim Mason July,2007 Larry Seeman